Bots. The word is everywhere and each week seems to bring a new project or piece of technology — from Facebook's new bot-building platform to Microsoft's Bot Framework to Taco Bell's bot for Slack. Journalism is not immune. Platforms like Quartz and Purple use bots to bring a conversational feel to news with a mobile apps and SMS interfaces while CNN’s bot will send you personalized news right through Facebook Messenger.
The potential appeal of bots lies with the ability of a news consumer to interact with them in a conversational way. But building a bot that can understand natural conversation is an intimidating challenge. Where to start?
One tool that might help is Wit.ai, which helps you quickly build apps people can talk to. It isolates all the complicated details, so that you can focuses on making something that functions, rather than writing new machine learning and natural language processing software.
So let’s talk about how to use Wit.ai to make your bots conversational.
Setting up your project
First, you’ll need to set up the basic structure for your bot. In my experience, Facebook’s Getting Started documentation is really helpful for setting up a simple functioning Messenger Bot using Node.js and Express. This Github tutorial provides an example of full working code, and if you want to build your bot with Python you can use this Flask example. There are also a lot of detailed Slack bot tutorials out there, like Scotch.io’s tutorial on how to build a Slack bot with Node.js.
Once you have the code for your bot setup, you’ll just need to deploy it so that Facebook or Slack can interact with it. One easy way to do this is to deploy the bot using Heroku.
Starting your app on Wit.ai
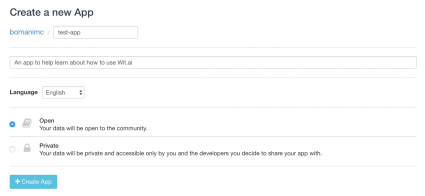
Now it’s time to dive into Wit.ai. Start by making an account and then create a new application.
Once you’ve made your application, you will be directed to your app’s "Story" page. A Story is a way to help represent the types of conversations that people will be having with your bot. For example, let’s imagine we’re building a bot called Capital Cities Bot that will tell a user what the capital city of any country is. Our first story might look something like this:
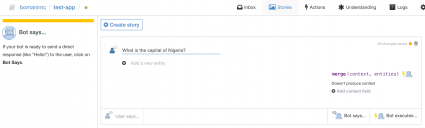
We then tell tell Wit.ai how the bot should respond. For our example, we'll have the Capital Cities Bot echo the location that is requested by the user. (This isn't a something you'd likely deploy, but it helps illustrate how Wit.ai works.)
Our first step is to capture the location entity. We can do this by highlighting the location in the sentence, and then clicking the “Add a new entity button." Notice that Wit already has a lot of entity presets listed for users out of the box, of which we can use the wit/location entity.
We can structure our response from the bot by clicking the “Bot says…” button on the right. Here, we can specify how we want the bot to respond. Since our bot is just echoing back the location for now, let’s have it say “You requested a capital for Nigeria." We can have Wit automatically include the captured location entity in our sentence by adding curly braces around the entity name.
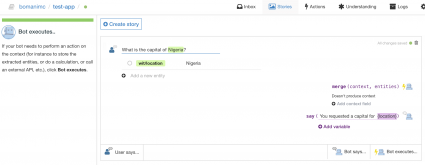
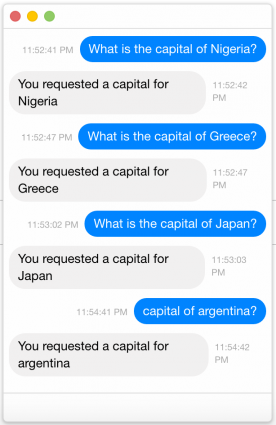
We can chat with our Wit.ai service directly from the Wit.ai website by clicking “~”. Notice that we only wrote a story for Nigeria, but the Wit.ai can generalize our example to other countries that the user might enter as well.
Creating a user-defined entity
In the Capital Cities Bot example, we were able to use one of Wit.ai’s pre-defined entities to extract the location from the user’s message. Wit.ai has a pretty extensive list of predefined entities, but we're also able to define entities on our own.
To help understand user-defined entities, let’s make a new example called Feelings Bot that will send you a message to complement how you’re feeling. For example, if you’re feeling sad, you can send the bot “I’m feeling sad” and it’ll send you a sad message in response. As before, let’s start by having the bot echo back the feeling that is sent to it by a user.
To do this, we are going to need a new entity. Let’s call it Emotion. To setup a new entity, switch to the Understanding tab and type a training example into the “Try out an expression” field. For Feelings Bot, let’s type “I’m feeling sad.” We can tag “sad” and add a custom entity like so:
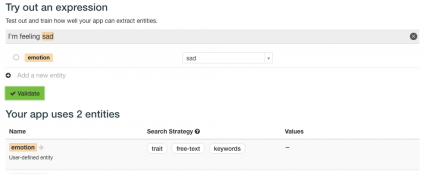
We can continue to do this for different feelings – happy, excited, depressed, ecstatic, and so on – clicking “Validate” after each addition. Eventually, you’ll notice that Wit.ai will begin to automatically tag the feelings in the example expressions you enter. This is how we train Wit.ai to recognize the custom entity we made for our application.
Notice that Wit.ai has some specific “Search Strategies” that it uses to help train the entity. For our purposes, we’ll want “free-text” and “keywords” set, but other more complex expressions may require “trait” to be selected. You can read more about Wit.ai Search Strategies in their documentation about entities.
Now we can add a Story, and use our emotion entity. Notice how Wit.ai can now echo the feelings from user input.
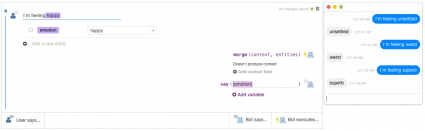
Keeping conversational context
You may have also noticed the “merge” function on the right side of each Story. This function serves to add data to the overall context of the conversation. This allows the bot to remember previous entities that have been captured in earlier messages from the users. Using our Feelings Bot as an example, let’s say that the user first says “I’m feeling sad” and the bot responds with a sad comment. If the user says “Tell me something else”, then the Feelings Bot will need to remember the feeling that the user had specified in their first message so that it can send another sad comment.
To add data to the context, simply enter the entity name into the merge function. Now, this data will be stored and persisted through the duration of the conversation so that the bot can reference the information as need.
Integrating Wit.ai into your bot’s server
So far we’ve learned how to get a basic bot running from the linked tutorials, and we also know how use Wit.ai to layout some of the basics response patterns for our bots. But how do we put it all together?
The next step is to integrate Wit.ai into the code for your bot’s server. Wit.ai has well-documented open source libraries and SDKs for iOS, Ruby, Node.js, and Python which you can access at the Wit.ai Github page. Using these libraries will make it easier for your bot’s server to interact with the Wit.ai platform, and each repository will have documentation explaining how add Wit.ai to your server. Once you have the Wit.ai client added to the server code, you can forward messages that are captured by the server (from the users) and then forward them to Wit.ai using something like the client.messages() function for Node.js. Wit.ai will respond with the messages you specified in your Stories, as well as the context and extracted entities.
And that’s how you make a bot that you can talk to. Please share your thoughts and advice in the comments! Now go build Iron Man’s Jarvis, or something crazy like that.
About the author